BlinkM user, Arduino hacker, and now iPhone developer Mike Colagrosso recently got approved a really neat iPhone app called Ciao. It's a way to find and control network-connected Arduinos from an iPhone. You can even define the UI the iPhone should use in the Arduino itself.
One of the examples he uses is how to control a BlinkM. Thanks Mike!
It's made from a solid 3" square cube of aluminum, with Lexan inserts for the heart shapes, it contains a a BlinkM MinM that pulses colors with a custom designed light script.
BrinkM in the Tipping Point Workshops Created by: Shigeru Kobayashi and Sunao Hiruta
http://www.vimeo.com/18318946
http://www.vimeo.com/18318998
http://www.vimeo.com/18319058
This was a small introductory workshop of around four to ten beginners to introduce the concept of hardware sketching. The group had between two and three hours to:
- Create a family of concepts and explore different ideas
- Design a light pattern using ThingM BlinkMs
- Create a lampshade in Illustrator and fabricate with Craft ROBO
The end result was some wonderful documentation of the project and a series of mini lanterns that utilized BlinkMs specific LED attributes. For a full documentation of the project please click on the report link below.
Did you know you can run Arduino programs on tiny BlinkM Smart LEDs? It might make BlinkM the smallest Arduino so far. To use a BlinkM as an Arduino, all you need is the free Arduino software, a low-cost AVR programmer, some wire, and a BlinkM.
Here's a quick video showing how it all works.
BlinkM Capabilities as an Arduino
The BlinkM board doesn't have nearly the I/O pins and other features of a real Arduino board. But it is very tiny. Here are its capabilities:
- 0.4" square (MinM), or 0.6" square (BlinkM)
- 8MHz clock speed
- 8k bytes Flash ROM (4kB on ATtiny45)
- 512 bytes RAM (256 bytes on ATtiny45)
- 512 bytes EEPROM (256 bytes on ATtiny45)
- 5 I/O lines total, partitioned as:
- 3 high-brightness LEDs in RGB package
- 2 digital I/O lines
- 1 analog I/O line (shared with digital)
And if you snip off the RGB LED, the three I/O lines used by it can be used as analog or digital inputs.
Most libraries will probably not work without some modifications. You don't get a hardware serial port either, but SoftwareSerial works.
Software Setup
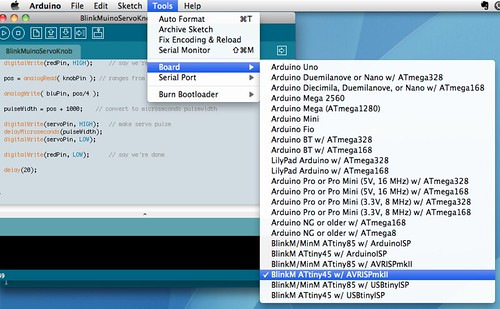
To enable the Arduino software to program BlinkMs, you'll need to teach Arduino about new "Boards". This is done via a set of config files and AVR core code. This work has been done by the High-Low Tech group at MIT and Alessandro Saporetti.
The BlinkMuino.zip zip file contains everything you need. This zip file works for Mac OS X, Windows, and Linux.
Unzip the BlinkMuino.zip file, and copy the resulting "hardware" folder into your Arduino sketchbook folder. You can find the location of your sketchbook by opening the Arduino preferences and looking at the "Sketchbook location" field.
Restart the Arduino software and the "Tools" -> "Board" menu should now have entries for BlinkMs. There are three sets of entries, depending on the type of BlinkM and programmer you have. Select the entry that is correct for your hardware.
Hardware Setup
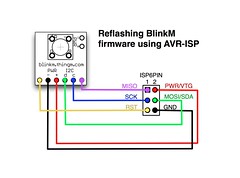
You will need an AVR-ISP programmer to program the BlinkM boards. If you have an Arduino board, the ArduinoISP sketch turns the Arduino into an AVR-ISP programmer. However, it doesn't work for all Arduino boards. Or you can use a regular AVR-ISP programmer. These are fairly low-cost: the Atmel AVRISPmkII is 35 USD, while the Adafruit's USBtinyISP is 22 USD.
With a programmer acquired, wire up the BlinkM to it. If using a regular AVR-ISP programmer, it should be wired up like below. The intro video shows a practical method of using a breadboard and jumper wires to convert the 6-pin AVR-ISP connector to something a BlinkM can use. Note that some programmers do not supply power to the BlinkM, so you may need to run power too.
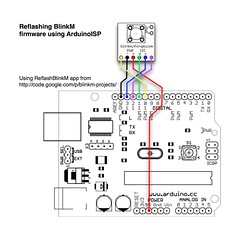
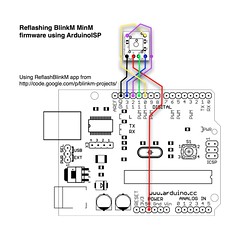
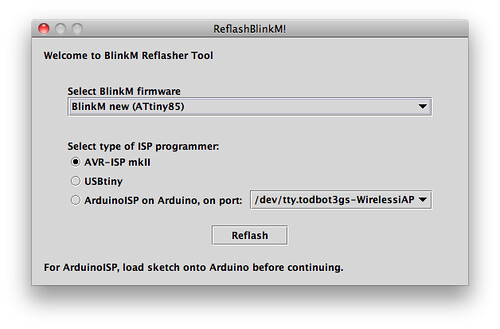
If using AruinoISP, the hookup is as below. See the diagrams and photos on the ReflashBlinkM page for details.
Using BlinkM as an Arduino
Now load up one of the example sketches located in the "hardware/blinkm/examples" folder of your Arduino sketchbook.
When you press the "Upload" button, the Arduino software will use send your program to the AVR-ISP programmer you've hooked up and it will program the BlinkM.
While the BlinkM is being programmed, its blue LED will flash. Once it stops flashing, the BlinkM starts running the Arduino sketch. At this point you can disconnect the BlinkM from the programmer and use it however you like. It runs stand-alone, no computer or Arduino board required, just power.
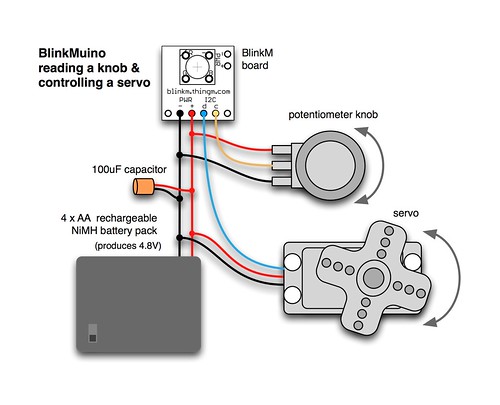
As an example, below is the "BlinkMuinoServoKnob.pde" sketch shown in the video. It assumes it is hooked up to a potentiometer knob and a hobby servo as in this diagram:
/*
 * BlinkMuinoServoKnob -- Control a servo with a knob
 * 2011 - Tod E. Kurt - http://todbot.com/blog/ - http://thingm.com/
 */

// BlinkM / BlinkM MinM pins
const int redPin = 3;  //
const int grnPin = 4;  //
const int bluPin = 1;  // PWM, will blink when programming
const int sdaPin = 0;  // PWM, 'd' pin, can be digital I/O
const int sclPin = 2;  // A/D, 'c' pin, can be digital I/O, or analog input

const int servoPin = sdaPin;
const int knobPin  = sclPin;

int pos;
int pulseWidth;

void setup() {
  pinMode(redPin, OUTPUT);
  pinMode(grnPin, OUTPUT);
  pinMode(bluPin, OUTPUT);

  pinMode(servoPin, OUTPUT);
  pinMode(knobPin, INPUT);

  digitalWrite(grnPin, HIGH);     // do a little "hello there" intro
  delay(100);
  digitalWrite(grnPin, LOW);
}

void loop() {
  digitalWrite(redPin, HIGH);     // say we're doing something
  pos = analogRead( knobPin ); // ranges from 0-1024
  analogWrite( bluPin, pos/4 );
  pulseWidth = pos + 1000;    // convert to microseconds pulsewidth

  digitalWrite(servoPin, HIGH);   // make servo pulse
  delayMicroseconds(pulseWidth);
  digitalWrite(servoPin, LOW);

  digitalWrite(redPin, LOW);      // say we're done
  delay(20);
}
Getting BlinkM back to Factory Firmware
Programming a BlinkM board with Arduino sketches erases the normal BlinkM firmware. If you want that functionality back, there is a collection of BlinkM factory firmware files and an application to program them called ReflashBlinkM. Use this to get your BlinkM back to factory-fresh conditions.
Have Fun!
Using the BlinkM board as a general purpose microcontroller board is a real blast. It's astounding being able to reprogram something so small with the easy-to-use Arduino software. If you develop something neat with a BlinkMuino, let me know in the comments.
BrinkM in Superhero Hawl Created by: Andy Wu, Chih-Pin Hsiao, Szu-Chia Lu, Staphanie Ahn
Georgia Tech students participated in the TEI2011 Super Hero Design Challenge.
Story Description:
Hawl is a successful conductor working with his orchestra. Music is Hawl’s love of life during the day. At the same time, he lives a secret life. He has a mysterious power of controlling music to spread joy and to defeat devils around the world. As long as evils are threatening the world, here comes Hawl to the rescue.
Technical Details:
Our super hero, Hawl's super power is to control the music and conduct a symphony through his body. He wears a dark blue robe with four Wii remotes attached to his arms and legs. The Wii remotes and motion plus sensors capture the movement of Hawl and send the data to a computer through Bluetooth. The computer interprets the data and recognizes the gestures or actions. After that the computer sends the interpreted information to an arduino board through Bluetooth. We connect 12 ThingM Smart LEDs to the arduino board, and then attached to the arms of our performer. When Hawl strikes a thunder into the sky, we can see a blue lightening starts from his shoulder to his forearm and hands and then into the dark sky on the projection screen. Likewise, he can cast a fire from his hand to a forest far away.
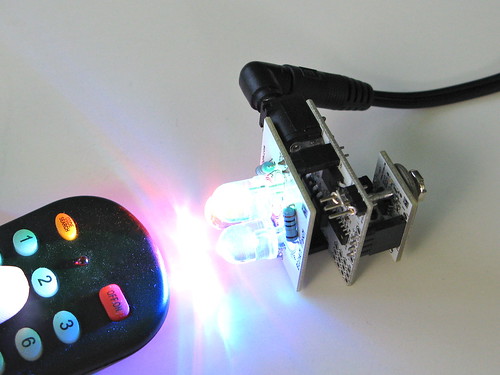
FreeM is an IR receiver and 9V adapter for BlinkM-family Smart LEDs. FreeM works with any universal remote via Sony-style TV commands. It also works with CtrlM
CtrlM is an I2C IR transmitter. CtrlM can be used with the LinkM USB-to-I2C adapter, Arduino, or any other I2C controller that can use a BlinkM. It appears as a BlinkM to BlinkM-aware applications such as BlinkMSequencer2.
CtrlM and FreeM are available now. See freem.thingm.com for retailers.
While FreeM is mostly designed to work with BlinkMs and MinMs, it can be made to work with MaxMs. FreeM cannot supply the power that MaxMs need (250mA and FreeM can only supply up to 100mA), but there are other ways. One way to do it is to power the FreeM from the MaxM's built-in 5V power supply.
To do this, get a MaxM, a FreeM, a small scrap of wire, and a 12VDC power supply.
Remove the "pwrsel" jumper and wrap the small piece of wire around all three pins of the "pwrsel" jumper. Then plug the FreeM into the bottom of the MaxM and plug in the 12VDC power supply to the MaxM.
The MaxM will power the FreeM and the FreeM will control the MaxM.
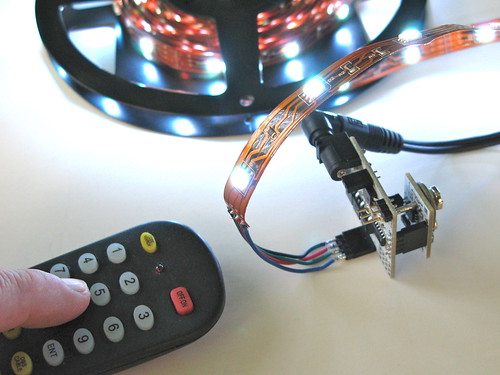
You can also now control other LED clusters like flexible RGB LED tape.
http://vimeo.com/20807505
BlinkM in Rocket ship Creators: Mike Rivamonte
I was looking for something I could use to illuminate my rocket ships. A friend suggested I use your FreeM's for my project and the reaction from viewers is great. I really liked the idea of controlling the color of the BlinkM with a Sony remote control.
I secured the FreeM inside the rocket ship and created a compartment for the 9volt battery. I added a toggle switch to save battery life when not in use.
Although the FreeMs are programmable my clients enjoy the simple cycle from one color to another. I am now creating more rockets that really take advantage of the FreeM and next will use a MaxM so I can really explore portholes all over the ships!
BlinkM in Miscommunication/Disconnect
Creators: Sarah Needham + Jeremy Eichenbaum
To communicate with lights is one thing, but to develop a myth and fiction behind them is another. When faced with the design problem of communicating through the various pulsing ofLED lights, we decided to fabricate a story that would supplement the Blink-M's programmable functions.
In essence, our project was about forming a fictional present to result in the fictional future of electronics outliving their makers and having to exist in a world without the same care and attention that they are used to receiving. Scientist John Castle realizes this fear [that electronics may need to survive alone] and decides to do something about it. Carefully, while toiling through many years of existence, he crafts a way for the electronics to communicate with the surrounding environment. Believing that they will one day need to survive in nature, he sets up a series of pulses and colors to reflect what he found in the immediate woods surrounding his home. A longer, slower pulse comes through the digital heart of the creature that holds the electronic while a much quicker, more desperate pulse emits from the body–an attempt to reach out to the
surroundings in hopes of creating a symbiotic relationship with the plant material. Castle's experiments involved a variety of locations for the electronics to eventually call home. Streams, natural caves, and amongst the trees were just a few of his ideas. He also carefully studied and dissected the relationship of the creatures when they were in the proximity of one another. Sadly, and much to his misfortune, Castle was never able to fully realize that as the creatures were left to their own devices [having lost their "electronic gardener"], their pulses died out; prevented from communicating in an adequate fashion, the creatures repulsed nature and one another.
Energy Mementos are small objects for collecting (generating) small amounts of electrical energy, keeping (storing) the energy, and recording and storing energy metadata related to the various qualities of its production such as direction, magnitude, age and time of energy generation; the energy metadata is used in various ways to share (distribute) and activate (use) the energy to which it refers.
For this project I built two functional Energy Mementos prototypes: The Shake-light bottle and the Turn-light Box. The basic idea is to generate small amounts of energy (by shaking a magnet in a coil winding, or turning a small DC motor), store the energy, store energy metadata about the magnitude of the energy generated, and then later “play back” the energy in interesting ways using the energy metadata.
One of many possible envisioned scenarios is to give the Turn-light Box to a loved one as an expression of the giver’s personal energy. The recipient could then keep the box in a special place, such as a shelf or drawer in the home. The recipient could, perhaps in a moment of longing for the giver, activate the giver’s energy using the box. The energy is activated as a unique pattern of light colors and intensities corresponding to the amplitude and direction of the electrical current generated and stored within the box.
The following circuit uses a voltage divider and zener diode to measure voltage and direction of power generated by turning a small DC motor by hand (100:1 gear ratio). An Arduino mini is also used. The Arduino is programmed to wake when voltage is detected on the SPEED pin and begin sampling voltage and direction. The measured energy metadata is stored in the onboard 512 bytes of EEPROM. A small switch is used to “play back” recorded energy an BlinkM RGB LED.