Inventables LED Contest
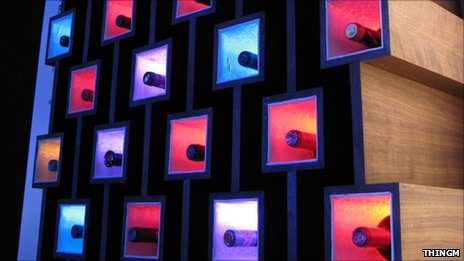
/ThingM MaxM in “Current”
/“Current: Technology+Contemporary Claycraft” by: Virginia Pfau MFA Ceramics Candidate, School for American Craft, Rochester Institute of Technology
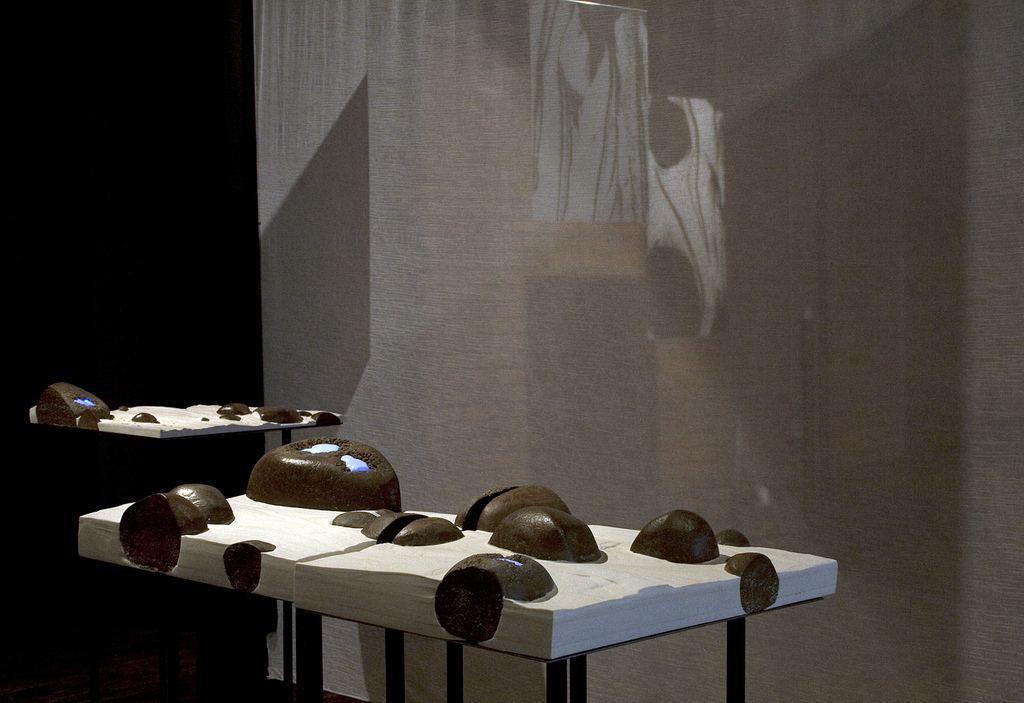
For my MFA thesis work, I chose to explore the integration of technology into the ancient art of clay sculpture. I dug a ton or so of mud from the local Genesee River boat dock, and formulated a paperclay out of it. I used this clay to make rock-like forms, and blasted some of them at my “weatheration station” in the studio, using water-erosion to create holes and textures. I then used Hydrostone, a material cousin to plaster, and a ramp system I rigged in my workspace to simulate the movement of water in a stream around the stones. I was able to control the composition of the stones in each piece, and to some extent the movement of and lines painted by the hydrostone as I poured it in layers around them, but I also enjoyed letting gravity do some of the artwork.
Since the stones were hollow, partly for weight and firing issues, partly to accommodate the lights, I heat-inlaid plastics into them and put combinations of ThingM blinkM and MaxM LEDs inside, programming them to pulsate gently with a soft blue light to match the visual speed of the “water”. I also added the occasional hint of a red or green to the lights, a simple task with the easy-to-use computer program I downloaded from the website. I coated the inside of each lighted stone with a reflective silver mylar to allow maximum light to flow out through the semi-opaque white plastic. I ran the LED lights off battery packs as demonstrated on the: http://todbot.com/blog/2011/02/25/blinkm-battery-pack-howto/ link, and wired together several MaxM Blaster Units off single Masters so that all the components could fit in the sculptures with multiple lighted rocks.
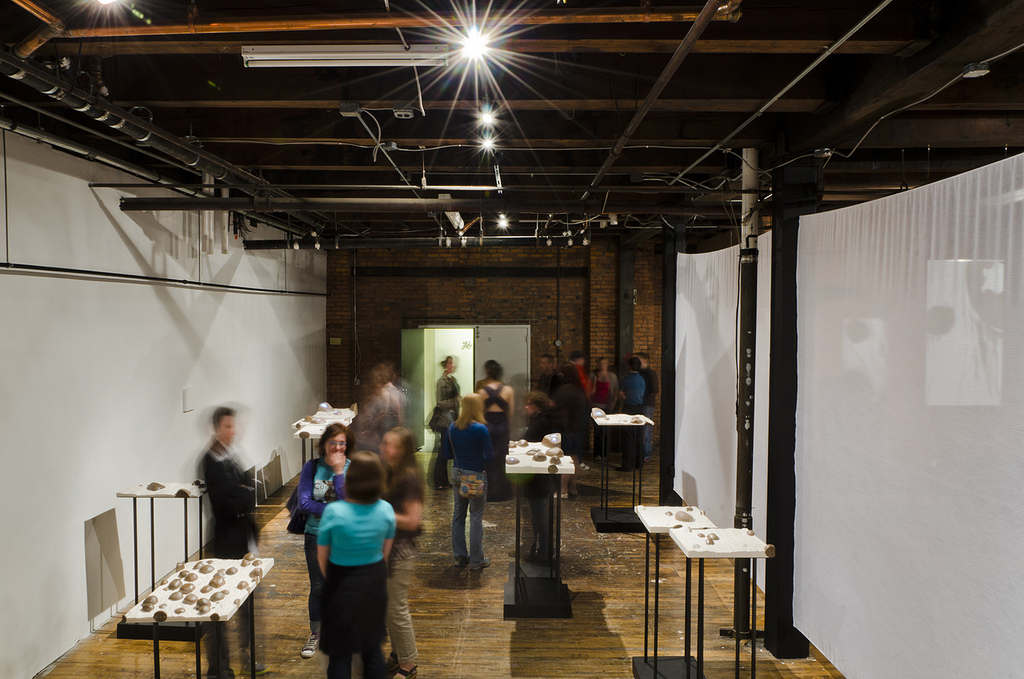
My thesis opening was held May 6 in a room I had rented at an old warehouse in Rochester. I had about 350-400 visitors attend the show, and they seemed to enjoy the work immensely. In the past several years at school, I had done a few other projects involving lights and LED’s, but I was always at odds as to what to do about the power source, and had received criticism when I showed the power cords, as with a piece I did with two wall outlet cords, or another piece I did with solar-powered LEDs. Using the ThingM products allowed me not only to entirely hide the power source for the lights, but also to control the patterns and colors of the lights in my sculptures. I was delighted to watch the public enjoy my sculptural installation, gaze at the pulsing lights, and then look underneath to find nothing but a steel plate.
For more photos and videos please visit: http://www.flickr.com/photos/va-pfau/5759732618/in/photostream
BlinkM Cylon mkII
/For Maker Faire this year I made a second version of my BlinkM Cylon: BlinkM Cylon mkII. This is not a very cost-effective way of getting a Cylon effect. It however is a good way of showing how to wire up multiple BlinkMs with a long cable, using our new WireM cabling kit for BlinkM. And unlike normal Cylon circuits, this has full RGB color effects and gradual fading.
Here’s a quick video showing it in action.
BlinkM Cylon mkII consists of:
- 13 BlinkMs (one for each of the tribes of Kobol)
- one WireM cabling kit for BlinkM, consisting of IDC connectors & ribbon cable
- an Arduino
- two 4.7k resistors
- a single push-button
- 9VDC wall wart to power it all.
- laser cut acrylic enclosure
Below are all the files needed to recreate your own BlinkM Cylon. Click any of the images for larger versions.
Firmware
The sketch that runs on the Arduino is pretty straight-forward. It’s a minor update to the existing BlinkMCylon sketch. You can find it on the blinkm-examples Google code project. The files are:
- BlinkMCylon.pde – the actual sketch
- BlinkM_funcs.h – BlinkM library
Circuit
The circuit is 13 BlinkMs and one Arduino hooked up to a single 4-wire I2C bus (Gnd/+5V/SDA/SCL). Like this:
Because the I2C bus is fairly long, two pull-up resistors on SDA (aka ‘d’ on BlinkM) and SCL (aka ‘c’) are added.
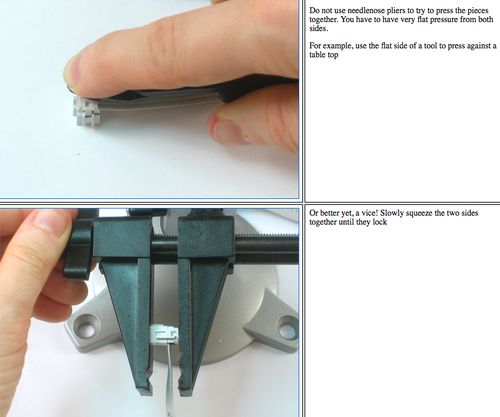
To assemble the cable, position the IDC socket connectors where you want them, and crimp them together. For the BlinkM Cylon, the connectors are spaced about 3″ apart. For info on how to crimp the connectors, see the bottom of the Adafruit USBtinyISP page, here’s a highlight
Enclosure
The enclosure is made from laser-cut acrylic. It’s mostly clear 1/8″ (3mm) acrylic with the diffuser made from 1/16″ (1.5mm) acrylic ceiling fixture diffuser sheet. The plans for cutting your own of these are available in EPS and CDR format from Thingiverse, they look like:
To secure the BlinkMs, little BlinkM holders were created. Each BlinkM is hot-glue tacked to the holder and the holder is snapped into the base plate. The entire laser cut assembly is meant to snap together. To keep it together use rubber bands, some dabs of super glue, or proper acrylic cement to make a permanent installation.
BlinkM in iPhone AppStore, sort of
/BlinkM user, Arduino hacker, and now iPhone developer Mike Colagrosso recently got approved a really neat iPhone app called Ciao. It's a way to find and control network-connected Arduinos from an iPhone. You can even define the UI the iPhone should use in the Arduino itself. One of the examples he uses is how to control a BlinkM. Thanks Mike!
For another great use of Ciao, check out Bildr's example controlling Nixie tubes.
Metal Portal 2 Weighted Companion Cube with BlinkM
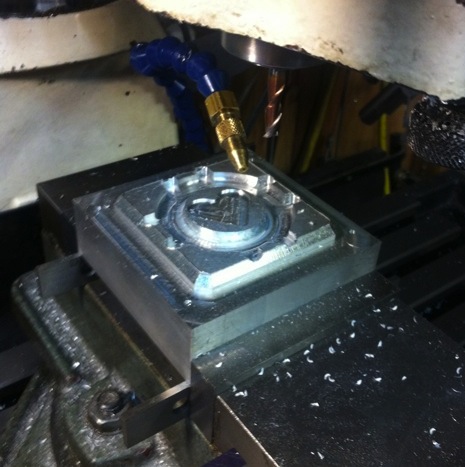
/Jamie Nasiatka used his CNC Mill to create an aluminum Weighted Companion Cube from the much beloved Portal 2 video game.
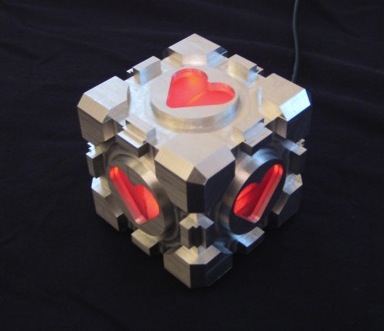
It's made from a solid 3" square cube of aluminum, with Lexan inserts for the heart shapes, it contains a a BlinkM MinM that pulses colors with a custom designed light script.
For more info, see details on the build and a photo gallery.
ThingM Project Feature: Tipping Point Workshop
/BrinkM in the Tipping Point Workshops Created by: Shigeru Kobayashi and Sunao Hiruta http://www.vimeo.com/18318946 http://www.vimeo.com/18318998 http://www.vimeo.com/18319058
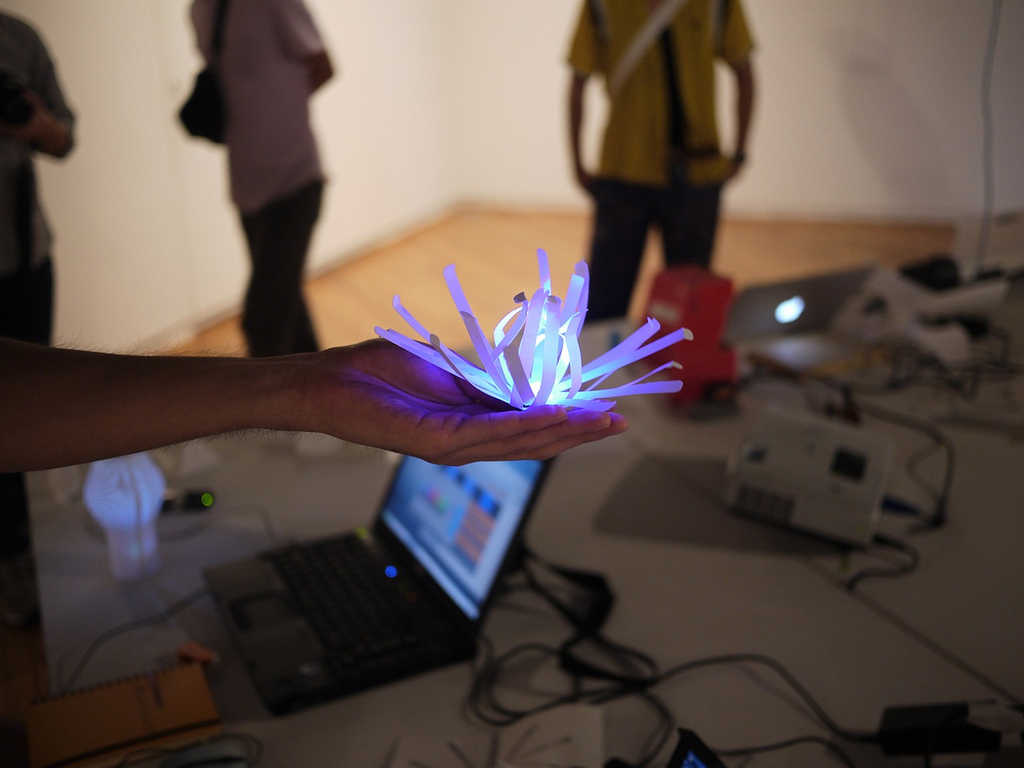
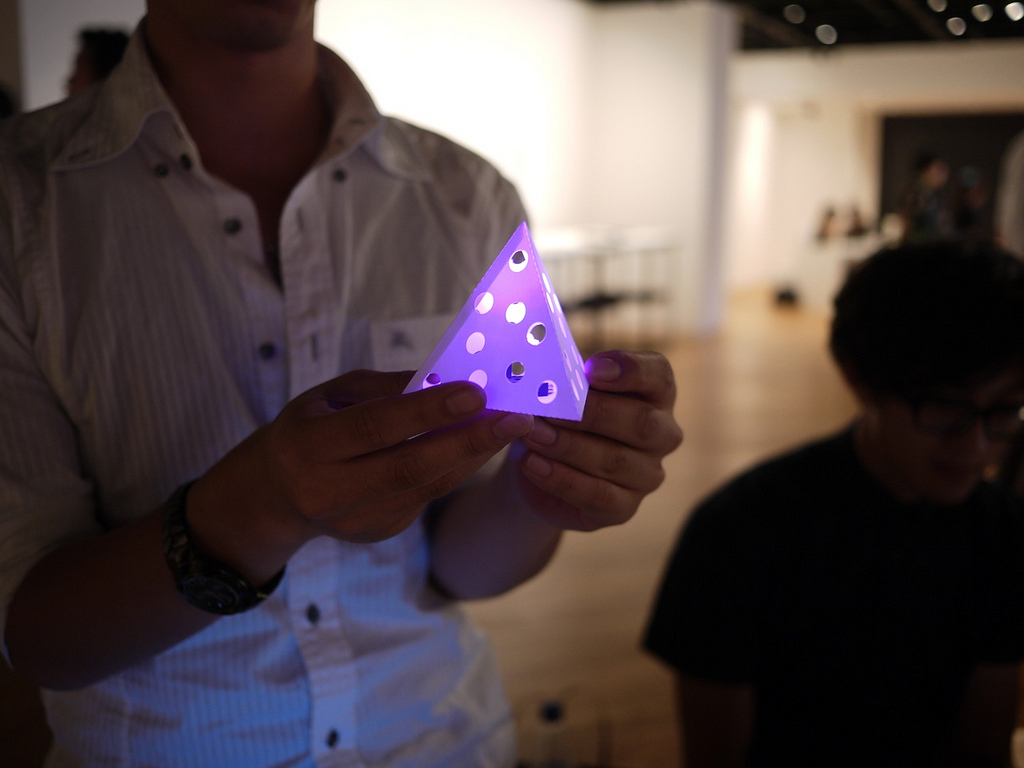
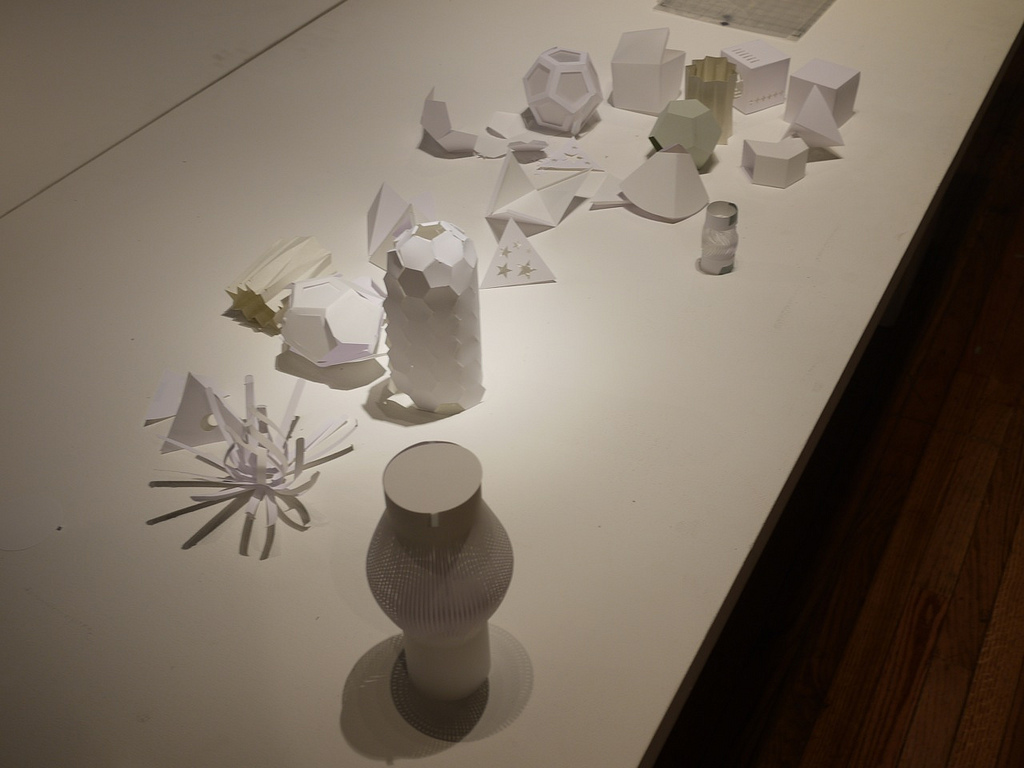
This was a small introductory workshop of around four to ten beginners to introduce the concept of hardware sketching. The group had between two and three hours to:
- Create a family of concepts and explore different ideas - Design a light pattern using ThingM BlinkMs - Create a lampshade in Illustrator and fabricate with Craft ROBO
The end result was some wonderful documentation of the project and a series of mini lanterns that utilized BlinkMs specific LED attributes. For a full documentation of the project please click on the report link below.
http://www.slideshare.net/kotobuki/hardware-sketching-workshop-with-blinkm-and-craft-robo
BlinkM Smart LED as the Smallest Arduino
/Did you know you can run Arduino programs on tiny BlinkM Smart LEDs? It might make BlinkM the smallest Arduino so far. To use a BlinkM as an Arduino, all you need is the free Arduino software, a low-cost AVR programmer, some wire, and a BlinkM. Here's a quick video showing how it all works.
BlinkM Capabilities as an Arduino
The BlinkM board doesn't have nearly the I/O pins and other features of a real Arduino board. But it is very tiny. Here are its capabilities: - 0.4" square (MinM), or 0.6" square (BlinkM) - 8MHz clock speed - 8k bytes Flash ROM (4kB on ATtiny45) - 512 bytes RAM (256 bytes on ATtiny45) - 512 bytes EEPROM (256 bytes on ATtiny45) - 5 I/O lines total, partitioned as: - 3 high-brightness LEDs in RGB package - 2 digital I/O lines - 1 analog I/O line (shared with digital)
And if you snip off the RGB LED, the three I/O lines used by it can be used as analog or digital inputs.
Most libraries will probably not work without some modifications. You don't get a hardware serial port either, but SoftwareSerial works.
Software Setup
To enable the Arduino software to program BlinkMs, you'll need to teach Arduino about new "Boards". This is done via a set of config files and AVR core code. This work has been done by the High-Low Tech group at MIT and Alessandro Saporetti.
The BlinkMuino.zip zip file contains everything you need. This zip file works for Mac OS X, Windows, and Linux.
Unzip the BlinkMuino.zip file, and copy the resulting "hardware" folder into your Arduino sketchbook folder. You can find the location of your sketchbook by opening the Arduino preferences and looking at the "Sketchbook location" field.
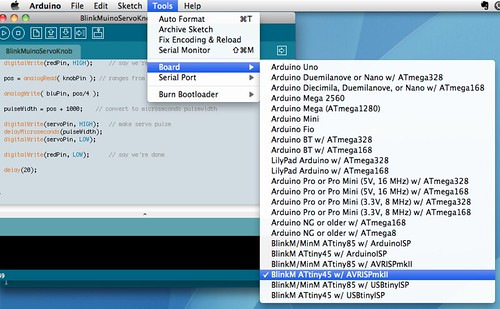
Restart the Arduino software and the "Tools" -> "Board" menu should now have entries for BlinkMs. There are three sets of entries, depending on the type of BlinkM and programmer you have. Select the entry that is correct for your hardware.
Hardware Setup
You will need an AVR-ISP programmer to program the BlinkM boards. If you have an Arduino board, the ArduinoISP sketch turns the Arduino into an AVR-ISP programmer. However, it doesn't work for all Arduino boards. Or you can use a regular AVR-ISP programmer. These are fairly low-cost: the Atmel AVRISPmkII is 35 USD, while the Adafruit's USBtinyISP is 22 USD.
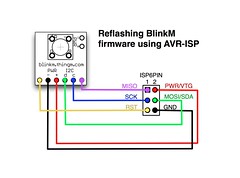
With a programmer acquired, wire up the BlinkM to it. If using a regular AVR-ISP programmer, it should be wired up like below. The intro video shows a practical method of using a breadboard and jumper wires to convert the 6-pin AVR-ISP connector to something a BlinkM can use. Note that some programmers do not supply power to the BlinkM, so you may need to run power too.
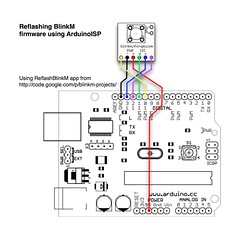
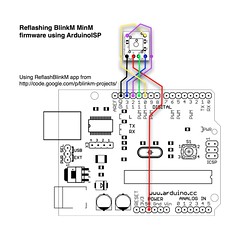
If using AruinoISP, the hookup is as below. See the diagrams and photos on the ReflashBlinkM page for details.
Using BlinkM as an Arduino
Now load up one of the example sketches located in the "hardware/blinkm/examples" folder of your Arduino sketchbook.
When you press the "Upload" button, the Arduino software will use send your program to the AVR-ISP programmer you've hooked up and it will program the BlinkM.
While the BlinkM is being programmed, its blue LED will flash. Once it stops flashing, the BlinkM starts running the Arduino sketch. At this point you can disconnect the BlinkM from the programmer and use it however you like. It runs stand-alone, no computer or Arduino board required, just power.
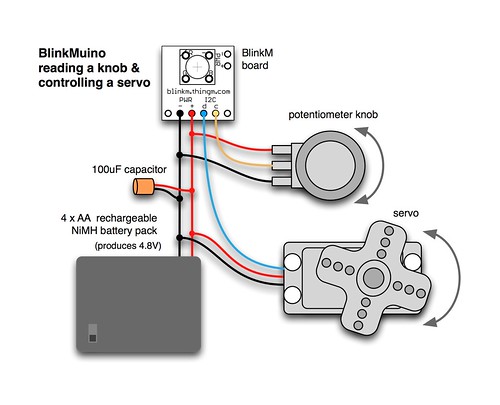
As an example, below is the "BlinkMuinoServoKnob.pde" sketch shown in the video. It assumes it is hooked up to a potentiometer knob and a hobby servo as in this diagram:
/*
 * BlinkMuinoServoKnob -- Control a servo with a knob
 * 2011 - Tod E. Kurt - http://todbot.com/blog/ - http://thingm.com/
 */

// BlinkM / BlinkM MinM pins
const int redPin = 3;  //
const int grnPin = 4;  //
const int bluPin = 1;  // PWM, will blink when programming
const int sdaPin = 0;  // PWM, 'd' pin, can be digital I/O
const int sclPin = 2;  // A/D, 'c' pin, can be digital I/O, or analog input

const int servoPin = sdaPin;
const int knobPin  = sclPin;

int pos;
int pulseWidth;

void setup() {
  pinMode(redPin, OUTPUT);
  pinMode(grnPin, OUTPUT);
  pinMode(bluPin, OUTPUT);

  pinMode(servoPin, OUTPUT);
  pinMode(knobPin, INPUT);

  digitalWrite(grnPin, HIGH);     // do a little "hello there" intro
  delay(100);
  digitalWrite(grnPin, LOW);
}

void loop() {
  digitalWrite(redPin, HIGH);     // say we're doing something
  pos = analogRead( knobPin ); // ranges from 0-1024
  analogWrite( bluPin, pos/4 );
  pulseWidth = pos + 1000;    // convert to microseconds pulsewidth

  digitalWrite(servoPin, HIGH);   // make servo pulse
  delayMicroseconds(pulseWidth);
  digitalWrite(servoPin, LOW);

  digitalWrite(redPin, LOW);      // say we're done
  delay(20);
}
Getting BlinkM back to Factory Firmware
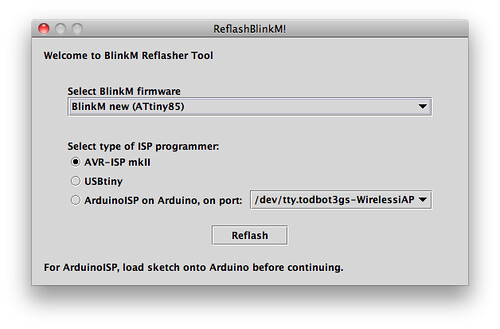
Programming a BlinkM board with Arduino sketches erases the normal BlinkM firmware. If you want that functionality back, there is a collection of BlinkM factory firmware files and an application to program them called ReflashBlinkM. Use this to get your BlinkM back to factory-fresh conditions.
Have Fun!
Using the BlinkM board as a general purpose microcontroller board is a real blast. It's astounding being able to reprogram something so small with the easy-to-use Arduino software. If you develop something neat with a BlinkMuino, let me know in the comments.
ThingM Project Feature: Superhero Hawl
/http://www.vimeo.com/19670944 http://vimeo.com/19781019
BrinkM in Superhero Hawl Created by: Andy Wu, Chih-Pin Hsiao, Szu-Chia Lu, Staphanie Ahn
Georgia Tech students participated in the TEI2011 Super Hero Design Challenge.
Story Description: Hawl is a successful conductor working with his orchestra. Music is Hawl’s love of life during the day. At the same time, he lives a secret life. He has a mysterious power of controlling music to spread joy and to defeat devils around the world. As long as evils are threatening the world, here comes Hawl to the rescue.
Technical Details: Our super hero, Hawl's super power is to control the music and conduct a symphony through his body. He wears a dark blue robe with four Wii remotes attached to his arms and legs. The Wii remotes and motion plus sensors capture the movement of Hawl and send the data to a computer through Bluetooth. The computer interprets the data and recognizes the gestures or actions. After that the computer sends the interpreted information to an arduino board through Bluetooth. We connect 12 ThingM Smart LEDs to the arduino board, and then attached to the arms of our performer. When Hawl strikes a thunder into the sky, we can see a blue lightening starts from his shoulder to his forearm and hands and then into the dark sky on the projection screen. Likewise, he can cast a fire from his hand to a forest far away.
ProjectBlog_Georgia_SHero (Downloadable PDF)
CtrlM & FreeM Demo
/FreeM and CtrlM let you create wireless BlinkM circuits.
FreeM is an IR receiver and 9V adapter for BlinkM-family Smart LEDs. FreeM works with any universal remote via Sony-style TV commands. It also works with CtrlM
CtrlM is an I2C IR transmitter. CtrlM can be used with the LinkM USB-to-I2C adapter, Arduino, or any other I2C controller that can use a BlinkM. It appears as a BlinkM to BlinkM-aware applications such as BlinkMSequencer2.
CtrlM and FreeM are available now. See freem.thingm.com for retailers.
